When the Fabric Arrives
Anyone who has ever ordered fabric or handled Quality Control knows this exact scenario: The fabric arrives at the factory, and the warehouse manager sends a quick note saying, “There’s a bit of an issue with this shipment.” Suddenly, you’re forced to go down and inspect it yourself. But when it comes down to whether the fabric is truly defective or acceptable to accept, many people feel uncertain. Relying on vague impressions like “It looks okay, I guess” often leads to customer complaints later on, while the fabric mill refuses to take responsibility—leaving you trapped in the middle.
The root of the problem? The lack of a standardized, quantifiable, and transparent fabric inspection process.
In this guide, we will break down the 4-Point System from top to bottom: how to sample, how to deduct points for defects, what score constitutes a pass, and what concrete evidence to use when negotiating with suppliers. Once you master this, you’ll conduct fabric inspections with complete confidence and authority.
1. First Things First: Why Use the 4-Point System?
In short: The 4-Point System assigns a specific point penalty to every defect on the fabric, generating a total score that helps determine whether the shipment should be accepted or rejected.
Subjective Visual Checks: Everyone has a different opinion on defect severity, which inevitably leads to endless disputes.
Objective Point Calculations: Defect size corresponds to fixed point values—creating a documented score that both parties can check against their agreed rules.
Industry Insider Fact: The 4-Point System is a widely accepted fabric inspection method. Why is it called the 4-Point System? Because the maximum penalty for a single defect is 4 points. Continuous defects must still be assessed along their affected length under the agreed grading rules; the cap does not mean that a defect extending through many yards receives only four points for the whole roll. ASTM D5430 describes visual grading methods and emphasizes using the same point assignment option when purchaser and supplier compare results. [1]
2. At a Glance: How Defect Points Are Deducted
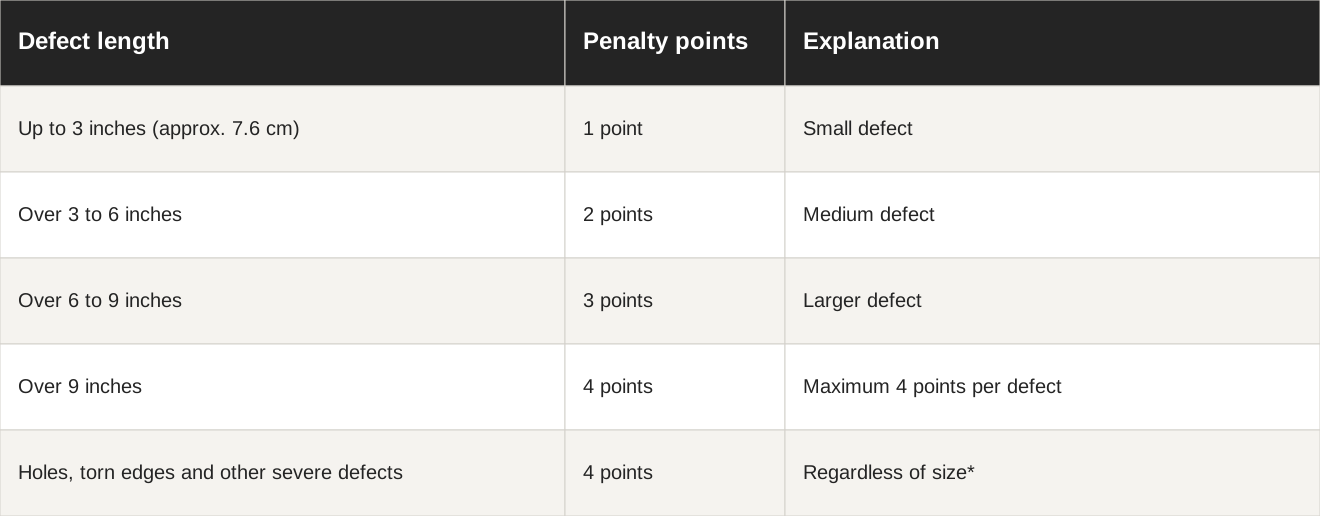
Standard 4-Point Deduction Rules (exact parameters may vary based on specific buyer/order specifications):
The Four-Point Cap per Linear Yard
Key Takeaway: Under the grading approach described here, no single linear yard of fabric can be penalized more than 4 points. That means even if a single yard is packed with dense, minor defects, the penalty caps out at 4 points. This rule prevents over-penalization and serves as a reminder: fabric inspection evaluates the overall quality level of the entire lot, rather than obsessing over an isolated flaw.
Confirm the linear-yard cap, treatment of continuous defects and any special rejection rules with the buyer before inspection.
3. How to Determine if a Fabric Lot Passes or Fails
The critical industry metric is Points per 100 Square Yards (Points / 100 sq. yd.). The formula is straightforward:
Points / 100 sq. yd. = (Total Penalty Points × 3,600) ÷ (Inspected Yards × Cuttable Width in Inches)
If math isn’t your strong suit, keep the following acceptance examples in mind. These are buyer/order benchmarks, not universal pass/fail limits prescribed by the method:
• General benchmark used in this guide: ≤ 20 points per 100 sq. yd. Acceptable allowance levels vary by client specifications and product tier.
• High-End / Luxury Orders: A buyer may specify 10–15 points.
• Standard Commercial Orders: A buyer may specify 20 points.
• Heavyweight / Coarse Greige Fabrics: An agreed allowance may be 30–40 points.
Example: You inspect 1,000 yards of fabric with a 60-inch cuttable width, recording a total of 300 penalty points.
Points / 100 sq. yd. = (300 × 3,600) ÷ (1,000 × 60) = 18 points
Based on a 20-point passing threshold, this fabric shipment passes the average-point requirement. Also check any agreed individual-roll limits, major-defect rules and unusable-length allowances.
Remember: Accept/Reject decisions must rely on this calculated metric and the agreed acceptance conditions, not personal gut feelings. When backed by data, both the fabric mill and the buyer have a common basis for reviewing the result.
4. Sampling Strategy: How Much Fabric Must Be Inspected?
If your sample size is insufficient, your inspection findings won’t hold up in a dispute:
• Sampling plan: The contributor recommends inspecting a minimum of 10% of total shipment volume as a starting point. For larger bulk orders or high-risk shipments, increase coverage accordingly. Agree whether this percentage refers to rolls, length or another basis; it is not a universal requirement of every inspection program.
• Randomized Selection: Never pick only the easiest rolls to unroll. Ensure samples represent different dye lots, batches, and production runs.
• Roll-Length Coverage: Checking only the roll heads and tails will miss crucial defects hidden in the middle. If the contract permits inspecting only 10%–20% of each selected roll’s length, distribute that coverage through the roll and record the actual inspected yardage. Some buyer programs require the full length of each selected roll; do not substitute a partial check without agreement.
• Maintain Audit Trail & Documentation: Document defect locations, types, and point values, accompanied by clear photos. This provides evidence during supplier negotiations or claim filings.
Words from Senior QC Veterans: The two most dangerous inspectors are those who let everything slide—signing off after a quick glance and panicking when issues arise later—and those who inspect with a magnifying glass, deducting 20 points on a single yard and condemning perfectly usable fabric. True QC professionals follow agreed sampling, objective point calculation, and data-driven evaluation. They neither overlook quality issues nor unfairly penalize the supplier.
5. Key Inspection Areas: Common Fabric Defect Categories
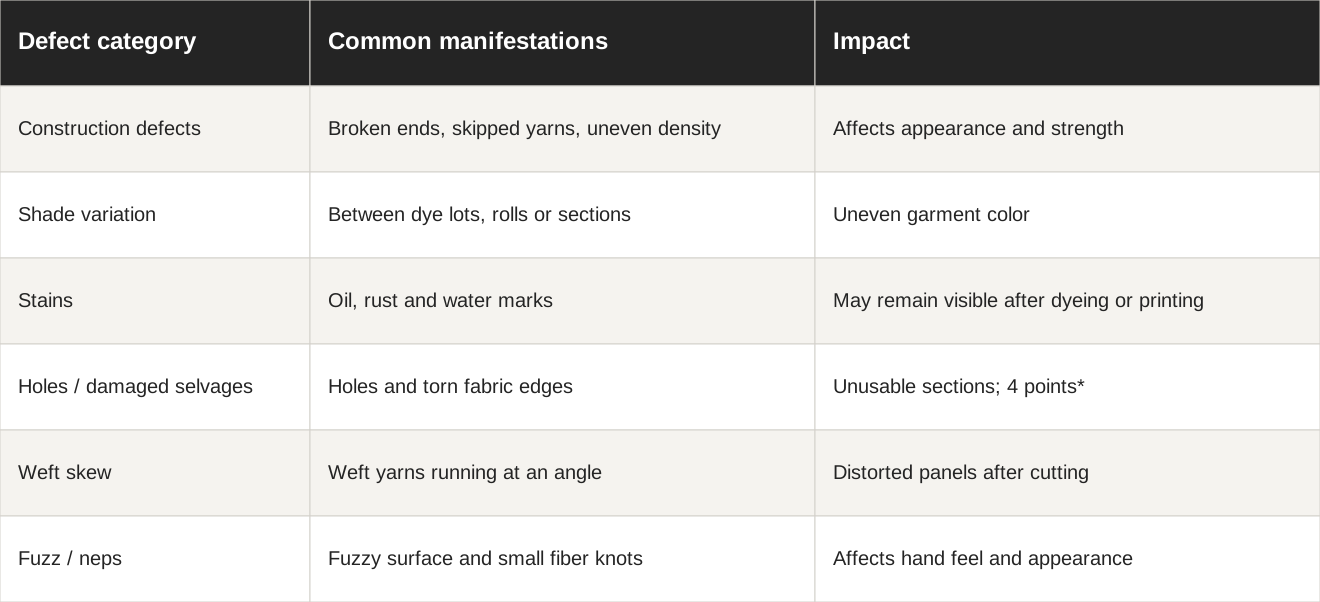
To conduct a thorough inspection without missing critical flaws, you must be able to properly identify defect categories:
Critical Note: Severe Defects and Unusable Length
When dealing with severe defects like holes, tears, or damaged selvages, don’t hold back: under the purchase terms proposed in this guide, automatically deduct 4 points regardless of size. Confirm this rule in writing, because hole-size rules and grading options can differ between buyers.
In practice, these sections often require a physical cut-out. If this fabric reaches the garment factory floor, it can lead to reworks and wasted yield. Track the affected length separately so that an acceptable average score does not conceal unusable sections.
6. How to Communicate Effectively with the Fabric Mill
The Professional Standard Statement (Establish metrics upfront in writing):
“This shipment will be inspected under the 4-Point System. The passing threshold is set at ≤ 20 points per 100 square yards. Any excess points will result in a price downgrade, return, or replacement, according to the agreed contract terms.”
“A random 10% sample size across different dye lots will be inspected, with all defects logged and photo-documented. The sampling basis and required coverage of selected rolls will be stated in the PO.”
“Major defects such as holes or damaged selvages will automatically be penalized 4 points under our agreed grading rules, with the total length of unusable fabric tracked separately for allowance claims.”
Pro Tip: Define inspection parameters in your Purchase Order (PO) or contract before placing the order. Negotiating standards after the fabric arrives at the factory puts you at a severe disadvantage—the mill will simply counter with “This is our standard factory quality,” leaving you with little leverage.
7. Three Critical Pitfalls to Avoid
Inspecting without a clear standard: Relying on gut feelings like “It looks okay” leaves you with no hard evidence during supplier disputes.
Under-sampling: Drawing conclusions after inspecting only two rolls leaves hidden defects scattered throughout the uninspected bulk.
Ignoring defect distribution: A lot may pass based on total average points, but if defects are heavily concentrated within a continuous 20-yard stretch, that specific section becomes completely unusable on the cutting table.
Fabric inspection boils down to three steps: Deduct points by the rules, calculate the final score using the formula, and determine pass/fail against the agreed standard. Master these three steps, and you operate as a true QC professional.
Conclusion
The next time someone tells you, “There’s a bit of an issue with this shipment,” don’t rush to accept or reject it. Grab your tape measure, apply the 4-Point System, and run the numbers—the total score gives you a clear, documented basis for the decision.
The 4-Point System rules in this guide describe a practical inspection approach. Final point deductions, sampling coverage, severe-defect treatment, and pass/fail thresholds should always align with your specific purchase agreement and buyer specifications. Visual grading does not replace required physical or laboratory testing.
Based on the contributor’s three-part manuscript. Both supplied Chinese tables were translated into English and redrawn for readability. The ASTM public scope was checked; numerical acceptance limits and sampling recommendations here are purchase-specification examples, not a reproduction of the full ASTM standard.
For incoming visual fabric inspection. Agree the grading option, inspection coverage, usable width, roll and shipment limits, severe-defect treatment, and remedies before ordering.
Sources
YOUR NEXT STEP
Put the details to work.
Estimate an order or turn your specifications into a supplier inquiry.